Whenever you start your computer, you are faced with a few moments of thumb twiddling while Windows XP boots and prompts you to log on. Although you should expect to wait for a few moments, sometimes Windows XP seems to boot rather slowly. In fact, you may notice that over a period of time the PC that used to roar to life seems a bit sluggish instead. Fortunately, you can perform several techniques that help Windows XP get the bootup speed you want. This chapter explores how to put these techniques to work.
Showing posts with label windows tweak. Show all posts
Showing posts with label windows tweak. Show all posts
Thursday, September 22, 2011
Vista System Restore
Are you one of the many computer users who went from using Windows XP to Windows Vista? It seems to be “the thing to do” these days, but let’s be honest here.
Are you having trouble finding some of the things you absolutely loved using in XP? How about the system restore feature, for example? I know that’s one of my favorites, but it’s so difficult to find in Vista. Well, today I’m going to give you the lowdown on how you can easily find it and start using it once again!
To get to the system restore window, right click on the Computer icon on your desktop and choose Properties. From there, click on the System Protection link on the left hand side. Another box will come up asking you if you want to continue on or cancel. Click Continue and then make sure you’re under the System Protection tab. At the top of the window, there’s a link you can click on to learn about how much disk space you need to do a system restore, etc. You can do that if you’d like or you can just move on.
To do an actual system restore, just click on the System Restore button and go through the process. Or, if you’d like to create your own restore point, click on the Create button. Type in a few key words for the point you’d like to go back to and then hit Create again. Go through the steps and you’ll be all set. In the middle of the window, you’re able to see all of the restores you’ve done in the past. So, if this is your first time, you’ll see all of them the next time you go in to do a system restore. When you’re all done, click OK and you’ll be good to go. So, from now on, you don’t have to worry about not being able to find the system restore option in Windows Vista.
Typing Useful Symbols for MS Office Fastly
These symbols can be used in MS Word, Excel, etc.
Here fast way to type any usefull symbols in Microsoft Office applications

For © : Alt+0169
For ® : Alt+0174
For ™ : Alt+0153
For › : Alt+0155
For † : Alt+0134
For ø : Alt+0248
For ¤ : Alt+0164
For « : Alt+0171
For ° : Alt+0176
For ± : Alt+0177
For ² : Alt+0178
For ³ : Alt+0179
For µ : Alt+0181
For ¶ : Alt+0182
For ¹ : Alt+0185
For » : Alt+0187
For ¼ : Alt+0188
For ½ : Alt+0189
For ¾ : Alt+0190
For Å : Alt+0197
For × : Alt+0215
For Ø : Alt+0216
For Þ : Alt+0222
For ß : Alt+0223
For ?: Alt+1
Hope you find these useful
Enjoy...
Here fast way to type any usefull symbols in Microsoft Office applications
For © : Alt+0169
For ® : Alt+0174
For ™ : Alt+0153
For › : Alt+0155
For † : Alt+0134
For ø : Alt+0248
For ¤ : Alt+0164
For « : Alt+0171
For ° : Alt+0176
For ± : Alt+0177
For ² : Alt+0178
For ³ : Alt+0179
For µ : Alt+0181
For ¶ : Alt+0182
For ¹ : Alt+0185
For » : Alt+0187
For ¼ : Alt+0188
For ½ : Alt+0189
For ¾ : Alt+0190
For Å : Alt+0197
For × : Alt+0215
For Ø : Alt+0216
For Þ : Alt+0222
For ß : Alt+0223
For ?: Alt+1
Hope you find these useful
Enjoy...
Boost your Cable/DSL speed: a Registry Hack
Here is a simple way to boost your Cable/DSL speed, just copy the ENTIRE BOLD text in the "quote" box below to Notepad, then save them as *.reg files, ie "DslBoost.reg".
Then all you have to do to modify/restore is double-click the *.reg file!!
REGEDIT4
[HKEY_LOCAL_MACHINE\SYSTEM\CurrentControlSet\Servic es\Tcpip\Parameters]
"GlobalMaxTcpWindowSize"=dword:0000ffff
It has worked wonders with me as it increased my speed from 5.0mbps all the way to 9.9mbps or sometimes a whole damn lot more like once it hit 15.7mbps youve got to try it!!
If u want to test your speed before and after the hack, goto this link for a free test of speed.
In my machine this hack has worked well, but I haven't tried for other machines. If this hack don't work for your machine, just simple doing the "undo registry" like thats above. Here is entry for undoing this hack:
REGEDIT4
[HKEY_LOCAL_MACHINE\SYSTEM\CurrentControlSet\Servic es\Tcpip\Parameters]
"GlobalMaxTcpWindowSize"=dword:00007fff
Remember that its for Cable/DSL only and not for crazy Dial-up!!
Note:
Some people confuse "Servic es" and change it to "Services". DON'T do this because it makes the hack not work!! Also, it took me a while to find out where I saved this so please thank me for this!!!
BTW: PLEASE make sure the "Hide extensions for known file types" option is unchecked........this will enable you to change the file type from *.txt to *.reg and activate the hack.
Lock Your Computer Fastly: a Windows Trick
Leaving your computer in a hurry but you don’t want to log off?
You can double-click a shortcut on your desktop to quickly lock the keyboard and display without using CTRL+ALT+DEL or a screen saver.
To create a shortcut on your desktop to lock your computer:
Right-click the desktop.
Point to New, and then click Shortcut.
The Create Shortcut Wizard opens.
In the text box, type the following: rundll32.exe user32.dll,LockWorkStation
Click Next. Enter a name for the shortcut.
You can call it "Lock Workstation" or choose any name you like.
Click Finish.
You can also change the shortcut's icon (ie: the padlock icon in shell32.dll).
To change the icon:
Right click the shortcut and then select Properties.
Click the Shortcut tab, and then click the Change Icon button.
In the Look for icons in this file text box, type: Shell32.dll.
Click OK.
Select one of the icons from the list and then click OK
You could also give it a shortcut keystroke such CTRL+ALT+L.
This would save you only one keystroke from the normal command, but it could be more convenient.
Increasing options in Add/Remove programs
Not a fan of MSN Messenger? Don't want Windows Media Player on your system? Fair enough, but if you go to Add/Remove Programs in the Control Panel, by default none of Windows XP's 'built in' programs are visible. It's fairly easy to change, though... just open the file X:\Windows\inf\sysoc.inf (where X: is the drive letter where Windows XP is installed) in Notepad. You should see a section of the file something like this:
 [Components]
NtComponents=ntoc.dll,NtOcSetupProc,,4
WBEM=ocgen.dll,OcEntry,wbemoc.inf,hide,7
Display=desk.cpl,DisplayOcSetupProc,,7
Fax=fxsocm.dll,FaxOcmSetupProc,fxsocm.inf,,7
NetOC=netoc.dll,NetOcSetupProc,netoc.inf,,7
iis=iis.dll,OcEntry,iis.inf,,7
com=comsetup.dll,OcEntry,comnt5.inf,hide,7
dtc=msdtcstp.dll,OcEntry,dtcnt5.inf,hide,7
IndexSrv_System = setupqry.dll,IndexSrv,setupqry.inf,,7
TerminalServer=TsOc.dll, HydraOc, TsOc.inf,hide,2
msmq=msmqocm.dll,MsmqOcm,msmqocm.inf,,6
ims=imsinsnt.dll,OcEntry,ims.inf,,7
fp_extensions=fp40ext.dll,FrontPage4Extensions,fp40ext.inf,,7
AutoUpdate=ocgen.dll,OcEntry,au.inf,hide,7
msmsgs=msgrocm.dll,OcEntry,msmsgs.inf,hide,7
RootAutoUpdate=ocgen.dll,OcEntry,rootau.inf,,7
IEAccess=ocgen.dll,OcEntry,ieaccess.inf,,7
This is a list of all components installed at the moment. I've taken the example of MSN Messenger - the program entry called 'msmsgs', third-last line. You can see the word 'hide' highlighted - this is the string which tells Windows not to display the component in the Add/Remove Programs list. Fix this up by simply deleting the word 'hide' like so:
msmsgs=msgrocm.dll,OcEntry,msmsgs.inf,hide,7
To this:
msmsgs=msgrocm.dll,OcEntry,msmsgs.inf,,7
Now, after restarting, you should be able to see MSN Messenger in the Add/Remove Programs list. If you want to be able to quickly view and remove all components, simply open the sysoc.inf file and do a global find and replace for the word ",hide" and replace it with a single comma ",".
The Free Tools That Can Access 100 Hidden XP Commands
Hidden Utilities XP allows access to nearly 100 hidden utilities that are not normally accessible to the average user. System information, diagnostics, repair tools and more in both Windows and Command Line utilities are now easily opened.
 Hidden Utilities XP includes easy access to 53 Windows tools and 43 Command Line utilities. And, Camtech2000, its developer now gives you it for free.

Solution for XP that can't start
 XP Start up problems
If you can't get system to boot, here the solution:
Boot your PC with Windows XP installer CD ( you have to set your BIOS setup in order your CD device will be running first on Boot priority).
Let the XP Setup progress running until you see the Setup option screen.
Recovery Console: the recovery console is actually the first option you can choose in the setup. It will look something like this:
Enter = Continue R = Repair F3 = Quit
Make sure you press R at the first selection screen and then press '1' to choose to work with the Windows XP installation. When asked for the password for Administrator, enter it in otherwise just press the enter key.
From there it will give you a screen that just says 'C:\_'. Make sure you type the following just as it is shown: CHKDSK /p. This will attempt to repair any serious errors found on the partition tables. (There are also other options as far as ways to repair the XP installation but i'll let someone else show that trick.)
Afterwards reboot and if you still have problems booting up into windows XP it's time to talk recovery options. (retrieving and backing up for a clean reinstall.)
OK, good luck !
I have Windows XP on my pocket - 3
Installing applications
Now that I have shown you how to create and install a basic Windows build, I want to talk for a moment about how you can add an application to the build (prior to creating it). The PEBuilder program comes pre-configured to support a number of common Windows applications, but does not come with the applications themselves.
The reason why installing applications can be a little bit tricky is because most Windows applications modify the Windows registry. The build that you are creating is basically a collection of installation files, and the build itself does not contain a registry (the registry gets created when Windows is installed onto the flash drive).
As such, PEBuilder uses a sort of registry emulator. If you go to the C:\PEBUILDER313\PLUGIN folder, you will see sub folders for a number of different applications. If you open one of these application folders, you will see that the folder contains an INF file and a FILES folder. The INF file contains all of the information that would normally go into the registry, and the FILES folder stores all of the program's files. To see how this works, let's install an application that I'm sure most of you are familiar with Nero.
Begin by installing Nero onto the machine that's running PEBuilder, as if you planned to run Nero locally on that machine. When the installation completes, copy all of the files from C:\Program Files\ahead\Nero to C:\pebuilder313\plugin\nero burning rom\files. In this particular case, the Nero burning rom folder is the folder that has been set aside for the Nero application. The Files sub folder is intended to store Nero's system files.
Now, you must take care of Nero's registry entries. To do so, go to the C:\pebuilder313\plugin\nero burning rom folder and open the PENERO.INF file using Notepad. As I explained earlier, the INF file in an application's folder is used to store the application's registry entries. For Nero and all of the other applications that PEBuilder predefines, the INF file is pre-configured.
You just have to make a few changes that are specific to your system. In this particular case, the PENERO.INF file is designed to support both Nero versions 5.x and 6.x. Initially, the lines for both versions are commented out. You must therefore determine which version you have and then remove the semi colon from the beginning of the lines that apply to that version.
You can see how the two versions are separated. Once you uncomment the appropriate lines, just replace "Your Name", "Your Company Name" and "Your Serial Number" with your name, your company's name, and your Nero product key. Save the file, and your set to go.
The next time that you click the Build button, Nero will be included in the build. Putting XP in your pocket Running Windows from a flash drive isn't an exact science. Sometimes the process just doesn't work and there is no good reason why. As more PCs start to support booting from USB devices though, USB boots should become more standardized, and the technique should become more reliable.
Done !
I have Windows XP on my pocket - 2
Booting from the USB flash drive.
Now that you have formatted your USB flash drive and installed the boot files onto it, the next thing that you must do is to configure your PC to allow you to boot from the flash drive. This is all done through the computer's BIOS Setup. I can't give you specific instructions for this part, because every computer is different. I can give you a few pointers though.
You can access your computer's BIOS by pressing a specific key immediately after you turn the PC on. The key varies, but it is usually either [F1], [F2], or [Delete]. Once you are in the BIOS Setup, you should verify that all of your computer's USB options are enabled. This might include things like support for legacy USB devices or support for USB 2.0. If there is a time out setting for USB devices, you should set it to the max to insure that the system doesn't time out while waiting on the USB device to boot.
Next, find the section on boot device priority. Normally, a USB flash drive (which is usually listed as USB-HDD, but may be listed as a removable device) will have a very low boot priority. If the USB flash drive's boot priority is lower than the hard disk (listed as HDD) then the only time the computer would ever boot off of the USB flash drive is if the system were to fail to boot from the hard disk. You must therefore rearrange the boot device priority so that the flash drive has a higher priority than the hard drive.
I have Windows XP on my pocket -1
 You can't boot Windows XP from a floppy disk the way you used to be able to with DOS. One handy way to easily boot XP is by using a USB flash drive. Here's how to make it work.
Almost everyone who has worked with computers for any length of time at all has run into at least one situation in which a problem left a PC unbootable.
Almost everyone who has worked with computers for any length of time at all has run into at least one situation in which a problem left a PC unbootable.
What if you could return the machine to a bootable state just by inserting a USB flash drive though? Believe it or not, it is actually possible to install a bootable copy of Windows XP onto a flash drive and then boot a PC off of the flash drive. From there, you can use applications that you have installed on the flash drive (anti virus, anti spyware, disk repair, etc.) to fix the PC's problem. In this article, I will show you how.
The Hidden Application in Windows
You can see the hidden application you never see before in your XP. Go to Start > Run > and type in: eudcedit
and press ENTER
and press ENTER
this will open up a font editor, names Private Character Editor, this program allowing you to design your own custom fonts and characters to be used in Windows apps like Microsoft Word, Adobe PhotoShop, etc. This the Microsoft Word Font Character hidden secret program in Windows XP. Enjoy it.
The Hidden Microsoft Song
Do you know the hidden Microsoft song? I hear this song while im installing windows, where its almost at the end where have to register your windows, enter your username.......etc.
 Some people might not hear it because, your sound card driver isn't installed. If you want to know and hear that song, here it:
Go to Start > Run > Copy and then Paste, or press and hold the Start + r .
C:\windows\system32\oobe\images\title.wma
and hit Enter, of course ... Your media player should load the song, and now you can hear it.
Go to Start > Run > Copy and then Paste, or press and hold the Start + r .
C:\windows\system32\oobe\images\title.wma
and hit Enter, of course ... Your media player should load the song, and now you can hear it.
Tweak Aero's glass borders: Vista Hack
The borders around system windows, such as dialog boxes and the Control Panel, are transparent in Windows Vista's Aero interface. These borders are hackable; you can shrink them, make them larger, and change their colors and transparency levels.
 To make the borders larger or smaller:
Cannot Run .exe files ?
What causes the program to run ("execute") when you double click the file name in My Computer or put it in the Run dialog box? Briefly put, it is an entry in the Windows Registry that does this.
For many, many different file extensions for files -- such as .doc for Word documents, or .txt for ASCII text files -- there is a location in the Registry that specifies how Windows handles such files. For .doc files it specifies, usually, that the Microsoft Word program (if present on the computer), or the Windows Accessory Wordpad if MS Word is not present, will be used to open up the document file so you can read and edit it. For .exe files, it specifies the "Open" action to be that which causes the program to run.
There are a number of viruses, trojans, and worms that mess up the Registry data for running executable (.exe) files, so this can cause nothing to seem to happen when you double click an .exe file name in My Computer or try to execute one by putting the name in the Run dialog box off the Start Menu.
Windows CE on your USB Stick : How To
Portable Windows CE is a 'launcher' for the Windows CE device emulator that can run an emulator-based image from a USB keychain.Change "Mcft" in link to what it is supposed to be
Extract the emulator to a folder on your hard drive by running "setup /a". The installer will prompt you to specify a directory to extract to.
For example: D:\PortableCE.
Copy the following launcher script to the folder you extracted the setup to. You'll need to rename the file from launchce.cmd.txt to launchce.cmd
Once you have that set up, just copy the entire D:\PortableCE folder over to your USB keychain.
To launch the emulator, just plug in your USB keychain, navigate to the PortableCE folder, and run launchce.cmd. You should (hopefully) have the emulator fire up.
Change Your IP In Less Than 1 Minute
Do this steps :
Click on "Start" in the bottom left hand corner of screen
Click on "Run"
Type in "command" and hit ok
You should now be at an MSDOS prompt screen.
Type "ipconfig /release" just like that, and hit "enter"
Type "exit" and leave the prompt
Right-click on "Network Places" or "My Network Places" on your desktop.
Click on "properties"
You should now be on a screen with something titled "Local Area Connection", or something close to that, and, if you have a network hooked up, all of your other networks.
Right click on "Local Area Connection" and click "properties"
Double-click on the "Internet Protocol (TCP/IP)" from the list under the "General" tab
Click on "Use the following IP address" under the "General" tab
Create an IP address (It doesn't matter what it is. I just type 1 and 2 until i fill the area up).
Press "Tab" and it should automatically fill in the "Subnet Mask" section with default numbers.
Hit the "Ok" button here
Hit the "Ok" button again
Run System Apps via Run Command
Access The Control Panel :
Add/Remove Programs control appwiz.cpl
Date/Time Properties control timedate.cpl
Display Properties control desk.cpl
FindFast control findfast.cpl
Fonts Folder control fonts
Internet Properties control inetcpl.cpl
Keyboard Properties control main.cpl keyboard
Mouse Properties control main.cpl
Multimedia Properties control mmsys.cpl
Network Properties control netcpl.cpl
Password Properties control password.cpl
Printers Folder control printers
Sound Properties control mmsys.cpl sounds
System Properties control sysdm.cpl
System Apps :
compmgmt.msc - Computer management
devmgmt.msc - Device manager
diskmgmt.msc - Disk management
dfrg.msc - Disk defrag
eventvwr.msc - Event viewer
fsmgmt.msc - Shared folders
gpedit.msc - Group policies
lusrmgr.msc - Local users and groups
perfmon.msc - Performance monitor
rsop.msc - Resultant set of policies
secpol.msc - Local security settings
services.msc - Various Services
msconfig - System Configuration Utility
regedit - Registry Editor
msinfo32 - System Information
sysedit - System Edit
win.ini - windows loading information(also system.ini)
winver - Shows current version of windows
mailto: - Opens default email client
command - Opens command prompt
Make Up Over Your Windows Look Like Ubuntu
If you are using a dual boot system with Ubuntu and Windows, you can clearly notice the limitations Linux has. And for many (myself included), Linux is extremely difficult. After awhile I came to the conclusion that I didn’t need ubuntu at all, but I still loved to look and feeling, after searching for ways to make my windows computer have that gnome feeling this is what I found:
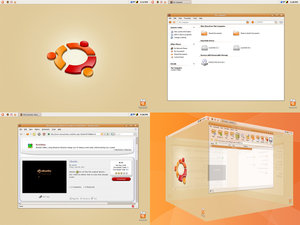 Start with the visual style, if you haven’t already install Uxtheme Multipatcher, this will remove the limitations on your system, in order to install new themes. Then download the Human Visual Style Ubuntu Linux.
 Go to C:\Windows\Resources\Themes and safe your download theme in there.
Remove the limit on TCP connection attempts: P2P Hack
Windows XP SP2 introduces a few new twists to TCP/IP in order to babysit users and "reduce the threat" of worms spreading fast without control. In one such attempt, the devs seem to have limited the number of possible TCP connection attempts per second to 10 (from unlimited in SP1). This argumentative feature can possibly affect server and P2P programs that need to open many outbound connections at the same time.
Rant: The forward thinking of Microsoft developers here is that you can only infect 10 new systems per second via TCP/IP ?!?... If you also consider that each of those infected computers will infect 10 others at the same rate:
second 1: 1+10 computers
second 2: 10+10*10 computers (110 new ones)
second 3: 10+100*10 computers ( 1110 new ones)
second 4: 10+1000*10 computers (11110 new ones)
Subscribe to:
Posts (Atom)