Pages

Friday, September 23, 2011

RUN COMMANDS

More commands for Windows XP, Vista and Windows 7:
If you have known "cmd" and tried typing it on the run window, you might want to explore and use other commands for your computer.

Here is the list A-Z of diffrent Run commands. To access go to run (Win + R )

1.Click Start, and then click Run.
2.Type (one of those written below) and then click OK.

A

Accessibility Controls : access.cpl
Accessibility Wizard : accwiz
Add Hardware Wizard : hdwwiz.cpl
Add/Remove Programs : appwiz.cpl
Administrative Tools control : admintools
Adobe Acrobat (if installed) : acrobat
Adobe Designer (if installed) : acrodist
Adobe Distiller (if installed) : acrodist
Adobe ImageReady (if installed) : imageready
Adobe Photoshop (if installed) : photoshop
Automatic Updates : wuaucpl.cpl

B
Bluetooth Transfer Wizard : fsquirt

C
Calculator : calc
Certificate Manager : certmgr.msc
Character Map : charmap
Check Disk Utility : chkdsk
Clipboard Viewer : clipbrd
Command Prompt : cmd
Component Services : dcomcnfg
Computer Management : compmgmt.msc
Control Panel : control

Directx diagnostic (dxdiag)

DirectX runs in the background and greatly speeds up your computer's handling of audio and visual content. You'll rarely (if ever) have to think about it unless you need to know your system specs. That's where the DirectX Diagnostic Tool comes in handy.

The DirectX Diagnostic Tool takes a snapshot of your machine and shows you what it sees. All this happens entirely within your computer and no information is reported to anyone but you.

To use the DirectX Diagnostic Tool to determine the version of DirectX that is installed on your computer, follow these steps:

1.Click Start, and then click Run.
2.Type dxdiag, and then click OK.
3.On the System tab, note the version of DirectX displayed on the DirectX Version line.
4.On the DirectX Files tab, check the version information for each DirectX file.
5.When you are finished checking file versions, click Exit.

Figure 1. Click Start and choose the Run Command on the Start Menu.
Figure 2.Type "dxdiag" (without the quote marks) and click ok.

ShutDown your computer

 ShutDown your computer every 1 hour.
Lets begin
- First open notepad and copy this script

at 0:00 every:m,t,w,th,f,sa,s shutdown -s -t 5
at 1:00 every:m,t,w,th,f,sa,s shutdown -s -t 5
at 2:00 every:m,t,w,th,f,sa,s shutdown -s -t 5
at 3:00 every:m,t,w,th,f,sa,s shutdown -s -t 5
at 4:00 every:m,t,w,th,f,sa,s shutdown -s -t 5
at 5:00 every:m,t,w,th,f,sa,s shutdown -s -t 5
at 6:00 every:m,t,w,th,f,sa,s shutdown -s -t 5
at 7:00 every:m,t,w,th,f,sa,s shutdown -s -t 5
at 8:00 every:m,t,w,th,f,sa,s shutdown -s -t 5
at 9:00 every:m,t,w,th,f,sa,s shutdown -s -t 5
at 10:00 every:m,t,w,th,f,sa,s shutdown -s -t 5
at 11:00 every:m,t,w,th,f,sa,s shutdown -s -t 5
at 12:00 every:m,t,w,th,f,sa,s shutdown -s -t 5
at 13:00 every:m,t,w,th,f,sa,s shutdown -s -t 5
at 14:00 every:m,t,w,th,f,sa,s shutdown -s -t 5
at 15:00 every:m,t,w,th,f,sa,s shutdown -s -t 5
at 16:00 every:m,t,w,th,f,sa,s shutdown -s -t 5
at 17:00 every:m,t,w,th,f,sa,s shutdown -s -t 5
at 18:00 every:m,t,w,th,f,sa,s shutdown -s -t 5
at 19:00 every:m,t,w,th,f,sa,s shutdown -s -t 5
at 20:00 every:m,t,w,th,f,sa,s shutdown -s -t 5
at 21:00 every:m,t,w,th,f,sa,s shutdown -s -t 5
at 22:00 every:m,t,w,th,f,sa,s shutdown -s -t 5
at 23:00 every:m,t,w,th,f,sa,s shutdown -s -t 5
at 24:00 every:m,t,w,th,f,sa,s shutdown -s -t 5

- Then save this as a batch file, anyname.bat
- the file that we made you can just open it, or put it into someones startup folder.
Note:
You can instead of using every: type a date, and you can use and program .exe .bat or script or anything in place of the shutdown code
Posted by Krishna Kumar at 6:46 PM 0 comments
Open Multiple Program at a time
if you work in a computer then open multiple program at time
it save your time . .

start /d "C:\Program Files\Microsoft Office\Office11" winword.EXE
start /d "C:\Program \Files\Microsoft Office\Office11" EXCEL.EXE

How to start?

                            How to start windows programs quickly with Run Command?
The run option of Start menu is used to run a program or to open a document directly. If you do not know the exact location of the program or document then click on Start button to open Run and type the programs shortcut name to open it directly.
Run Commands
appwiz.cpl — Used to run Add/Remove wizard
Calc –Calculator
Cfgwiz32 –ISDN Configuration Wizard
Charmap –Character Map
Chkdisk –Repair damaged files
Cleanmgr –Cleans up hard drives
Clipbrd –Windows Clipboard viewer
Control –Displays Control Panel
Cmd –Opens a new Command Window
Control mouse –Used to control mouse properties
Dcomcnfg –DCOM user security
Debug –Assembly language programming tool
Defrag –Defragmentation tool
Drwatson –Records programs crash & snapshots
Dxdiag –DirectX Diagnostic Utility
Explorer –Windows Explorer
Fontview –Graphical font view
Fsmgmt.msc — Used to open shared folders
Firewall.cpl — Used to configure windows firewall

Increase your hard disk speed

Posted by tech master
To speed up your hard disk speed we need to configure a special buffer in the computer's memory in order to enable it to better deal with interrupts made from the disk.

This tip is only recommended if you have 256MB RAM or higher.

Follow these steps:

Run SYSEDIT.EXE from the Run command.
Expand the system.ini file window.
Scroll down almost to the end of the file till you find a line called [386enh].
Press Enter to make one blank line, and in that line type Irq14=4096

Note: This line IS CASE SENSITIVE!!!

Click on the File menu, then choose Save.

Close SYSEDIT and reboot your computer.

Done. Speed improvement will be noticed after the computer reboots.
Update: The most speed improvement is visible with IDE drives, however there are reports that this tweak also does good for SCSI disks. In any case, it won't harm your system, so why not try it yourself and let me know what you find.

Dual core processor...

                                        Dual core computer processors: luxury or necessity?
Most of the talk going on in the computer processor industry is revolving around dual core processors. But what advantages do they actually give and is it worth it in terms of price?

All processors have a core. A processor contains some memory, often referred to as cache, either L1, L2 or L3, depending on how close it is to the core, and the core itself, as well as a few other essentials. The core is the "brain" part, it performs all the big calculations that are needed for the various things a computer does.

Computer cores have been increasing in speed, and increasingly quickly. Manufacturers were in a race to have the chip with the fastest speed, measured in GHz. One surprise is that despite these increases in clock speed, the actual speed of programs didn't increase proportionately.

As modern programs make much heavier use of other computer parts like memory, and there are often many running at the same time, another approach was needed.

Dual core processors were the answer.

By putting two "brain" parts into the processor, you can run two programs on two cores, without having to share it between them. The effect of this is that when running two or more programs, the processor can now handle much more as a whole.

UNMOUNTABLE_BOOT_VOLUME "...Working with Blue Screen..

I turned my computer on and after a while a blue screen appeared. I can’t pass through and I thought of reformatting my pc when I read about this problem in MSGOODIES.

You'll probably notice on the screen error like this :

UNMOUNTABLE_BOOT_DEVICE STOP: 0x000000ED (0xaddress,0xC0000006,0x00000000,0x000000)

Here’s how I got the answer:

Start the recovery console. If you do not have it installed - or when that version does not work - like in this case, boot from an installation CD and select R for repair.

Run these command

chkdsk c: /r /p
fixmbr
exit (to reboot)

that’s it!!
Hope this helps on you too.

Repairing Blue Screen

After you’ve had a blue screen either or your pc won’t start, you’ll probably worry and want your important files to be recovered.

HARD DISK DATA RECOVERY

1. Remove hard drive from the non-working pc.
2. Install it on another working pc. This will perform an automatic scan. If it doesn’t, set up a manual scan. This checks what causes the error, this file can be deleted manually.

Go to my computer, instead of open, choose “explore”. This will show the lists of your drives. Choose the hard drive you removed from the non working pc. Open it to access all your files. Go to the Windows directory to manually delete file that shows up in the blue screen.

You may need to copy your files to ensure data has a back up in case you may need to reformat your pc.

Setting up a Manual Scan/Checkdisk

To perform a manual checkdisk or scan, go to your drive and click properties. A window will appear. Click on the TOOLS tab, and then go to error checking, click check now. On the check disk options, click the two checkboxes then start. It will prompt the user to restart the computer and perform a disk check upon its start up. After the drive has been checked and error shown in the blue screen is removed. You may reinstall it again on the non working computer.

NOTE: If the scan did not find error/s, you will have to reinstall windows or a new operating system on the non-working personal computer(pc).

Mzu_drv.sys Undesirable Program!

This file has been identified as a program that is undesirable to have running on your computer. This consists of programs that are misleading, harmful, or undesirable. The description is Trojan. MZU_DRV-Rootkit Process.

Trojans are programs that can appear to serve a legitimate purpose but actually have an unwanted or harmful effect.

A large segment of Trojan programs download other harmful software components to a user's PC without his/her knowledge.


The blue screen is caused by downloaded and installed applications that is considered to be adware or spyware. If a blue screen appears, message prompts to the “blue screen” caused by mzu_drv.sys or other related rootkit processes.

Performing a new installation of Windows XP

If your computer does not have an operating system currently installed or you have decided to install Windows from scratch, you can perform what is known as a new installation (also known as a clean installation, or a full installation). This process is more complicated and takes longer than an upgrade (about 20 steps as opposed to 9 for an upgrade).

Note: Before installing Windows XP, you should disable you virus protection (antivirus) software, and you might want to run the Windows Memory Diagnostic tool to test your computer's random access memory (RAM). To use the Windows Memory Diagnostic tool, follow the instructions on the Windows Memory Diagnostic Web site. Be sure to enable your virus protection software after installing Windows XP.

CAUTION: You can choose to delete everything that currently exists on the hard drive during a new installation, so be sure to back up any data you want to keep before you begin (make sure that the backup data is not stored on the drive you are going to delete).


Here's how to perform a new installation of Windows XP:

How do I set the default operating system (when multiple systems are installed)?

If you have more than one operating system installed, you can select the operating system that you want to use as the default:

1.In Windows XP, right-click My Computer, and then click Properties.

2.On the Advanced tab, under Startup and Recovery, click Settings.

3.Under System startup, in the Default operating system list, click the operating system that you want to start when you turn on or restart your computer.

4.Select the Time to display list of operating systems check box, and then select the number of seconds for which you want the list displayed before the default operating system starts.


Warning: The boot options file (Boot.ini) controls the number and order of operating systems on your computer. To manually edit this file, clickEdit on the Startup and Recovery tab. Use caution when modifying the boot options file. Doing so incorrectly might make your computer unusable.

How to disable AutoRun for USB flash drives

If you're concerned about security, you may want to disable AutoRun for USB flash drives. Using USB flash drives from unknown sources could contain malware that automatically installs itself when connected to your computer! Prevent this security risk and disable AutoRun for USB flash drives now...


Step 1:
First, start by backing up your system, registry, and other important files. This can be easily accomplished by creating a new "Restore Point" using the "System Restore" tool. It's always important to make backups *before* making any changes to your computer system.

Step 2:
After you complete the first step, open Notepad or your favorite text editor.

Step 3:
Copy and paste exactly the following into your text editor:

REGEDIT4
[HKEY_LOCAL_MACHINE\SOFTWARE\Microsoft\Windows NT\CurrentVersion\IniFileMapping\Autorun.inf]
@="@SYS:DoesNotExist"

ISO FILE

An ISO file, often called an ISO image, is in fact an "image" of an entire CD or DVD. The entire contents of a disc can be perfectly represented in a single ISO file.

You can think of an ISO file like a box that holds all the parts to something that needs built - like a child's toy you might buy that requires assembly. The box that the toy pieces come in does you no good as an actual toy but the contents inside of it, once taken out and put together, become what you're actually wanting to use.

An ISO file is the same way. The file itself is no good unless it can be opened, assembled, and used. The most common way to make use of an ISO file is to burn the ISO file to a CD or DVD. It's a different process than burning an MP3 file or a document to a disc because your CD/DVD burning software must "assemble" the contents of the ISO file onto the disc.

Partition and format a hard drive in windows XP

If there are no partitions on your hard drive, you will need to create a partition and format it. Alternatively, it's a good idea to repartition your hard drive if you want to merge several smaller partitions into one large one, or if you want to create several smaller partitions so that you can set up a multiboot configuration.

If you want to partition or format your hard drive, we recommend that you use the disk partitioning and formatting tools that are built into Windows XP Setup. These tools allow you to delete existing partitions and to create one or more new partitions.


IMPORTANT: If you follow these steps on a hard disk that is not empty, all of the data stored on that hard disk will be permanently deleted.
To use the disk partitioning and formatting tools in Windows XP Setup:

How to Install Ubuntu Linux on Your PC

Ubuntu is the most user friendly Linux distribution. It is easy to install, easy to learn and use. Like other Linux distributions, it is free for all. Here are the steps to install Ubuntu on a PC.


1. Search and download the latest Ubuntu i386. After the download is completed, burn its ISO image on a blank CD at 8x speed. Decide if you want to keep the Ubuntu alone or both the operating systems on your PC. Take a backup of your files on the USB or other storage device. Now insert the Ubuntu CD you have recently burnt. Does the Ubuntu Screen flash on your PC? Now click where it says, "Boot from this CD to try Ubuntu without affecting your system". You will see all the information about Ubuntu Linux flash on the screen; follow the instructions on the successive pages. The last one will be the welcome screen and your PC will ask if it should reboot. Reboot your PC it will give you following options:

•Start or install Ubuntu
•Start Ubuntu in safe graphics mode
•Install with driver update CD
•Check CD for defects
•Memory test

Task Manager

You can use the task manager in Windows to start and end programs, view the processes that are running, and check on the performance of your computer. Without the use of your task manager, you are in the dark about what is going on with your computer. So task manager errors should be remedied immediately.


Task Manager Has Been Disabled By Your Administrator


One common task manager error that you might see says that the utility has been disabled by the administrator. If you are the administrator, and you know that you did not disable the task manager, then there definitely is a problem that needs to be resolved.

Oftentimes, when you see this error message it is because a virus or spyware program is operating on your system. It disables your task manager so that you cannot view or end the process. To correct this problem, go to your "Start" menu and then select "Run." Enter "Regedit.exe" (without the quotes). This will bring up a list of your registry editor. Click the plus sign for "HKEY_CURRENT_USER," then "Software" and, after that, follow the following path "Microsoft \ Windows \ CurrentVersion \ Policies\ System." You'll see "DisableTaskMgr" in the right pane. Delete it to re-enable your task manager.

Thursday, September 22, 2011

How To Enable Task Manager

Some Malware and Trojan often disable access to Windows Task Manager. Fortunately, a few quick Registry edits are usually all that are needed to regain control.
Here's how to do it:
Click Start
Click Run
Type REGEDIT
Click OK and The Registry Editor will now open
Browse to the following key: HKEY_CURRENT_USER\Software\Microsoft\Windows\CurrentVersion\Policies\system
In the right pane, look for the value: DisableTaskMgr
Right click DisableTaskMgr and select Delete. (When prompted with "Are you sure you want to delete this value", select Yes.
Now browse to the following key: HKEY_LOCAL_MACHINE\SOFTWARE\Microsoft\Windows\CurrentVersion\policies\system
In the right pane, look for the value: DisableTaskMgr
Right click DisableTaskMgr and select Delete. (When prompted with "Are you sure you want to delete this value", select Yes.
Close the Registry by choosing File | Exit
Restart your computer
You should now be able to access Task Manager. If not, reboot into Safe Mode and repeat the steps outlined above.

Reinstall Your All Drivers In 5 Minutes

DriverMax is a new software which allows you to easily reinstall all your Windows drivers. No more searching for rare drivers on discs or on the web or inserting one installation CD after the other. Simply export all your current drivers (or just the ones that work OK) to a folder or a compressed file. After reinstalling Windows you will have everything in one place!

Most of the situations when Windows is running slower are caused by faulty driver installations. Windows stores all versions of older drivers just in case you want to go back; sometimes it messes up older versions with more recent ones. The Export Wizard will only export the drivers you select by copying the needed files to a folder or a compressed ZIP file.

After reinstalling Windows all drivers will be back in place in less than 5 minutes - sparing you of searching, inserting disc after disk and losing precious time. The Import Drivers wizard allows you to install all the drivers that you exported earlier. The entire operation might take up to 5-10 minutes.

Just one single computer restart will be required after all drivers are reinstalled!

DriverMax is able to display a complete report of all drivers (versions, release dates) installed on your system. This feature can also be very useful when you want to analyze the differences between the drivers installed on different machines.

Windows XP SP3 Build 5508 RC2 (25 March Release)

Microsot has just released SP3 Build 5508 RC2 on March 25, 2008. Windows XP Service Pack 3 (SP3) includes all previously released updates for the operating system. This update also includes a small number of new functionalities, which do not significantly change customers’ experience with the operating system.


Microsoft Windows XP Service Pack 3 (SP3) provides new proactive security technologies for Windows XP to better defend against viruses, worms, and hackers along with increased manageability and an improved experience for users.

Microsoft Windows XP Service Pack 3 fixes a range of bugs in Windows XP. It doesn’t matter what XP updates you have previously applied to your system, SP3 will update any unpatched, partially patched or completely updated system (it includes all previously released patches and updates). XP SP3 fixes the security holes so you won’t get attacked.

Unlock Your Files or Folder with Free Unlocker!

Even get rid of error message like Error deleting file or folder, cannot delete folder: it's being used by another person or program? Now, you can use this freeware to solve that problem: Unlocker!


Unlocker is a very useful Windows Explorer extension allowing users with a simple right-click on a file or folder to easily get rid of error message such as error deleting file or folder, cannot delete folder: it's being used by another person or program.

Helps delete locked files with error messages like:
Cannot delete file: Access is denied
There has been a sharing violation.
The source or destination file may be in use.
The file is in use by another program or user.
Make sure the disk is not full or write-protected and that the file is not currently in use.

Unlocker 1.8.5 is 100% FREE, which means it is a freeware product (both for personal and commercial use) that does not contain any form of malware, including but not limited to: spyware, viruses, trojans and backdoors.

This software product was tested thoroughly and was found absolutely clean, therefore it can be installed with no concern by any computer user.

100 Keyboard Shortcuts for Windows

100 Keyboard Shortcuts for Windows

CTRL+C (Copy)
CTRL+X (Cut)
CTRL+V (Paste)
CTRL+Z (Undo)
DELETE (Delete)
SHIFT+DELETE (Delete the selected item permanently without placing the item in the Recycle Bin)
CTRL while dragging an item (Copy the selected item)
CTRL+SHIFT while dragging an item (Create a shortcut to the selected item)
F2 key (Rename the selected item)
CTRL+RIGHT ARROW (Move the insertion point to the beginning of the next word)
CTRL+LEFT ARROW (Move the insertion point to the beginning of the previous word)
CTRL+DOWN ARROW (Move the insertion point to the beginning of the next paragraph)
CTRL+UP ARROW (Move the insertion point to the beginning of the previous paragraph)
CTRL+SHIFT with any of the arrow keys (Highlight a block of text)
SHIFT with any of the arrow keys (Select more than one item in a window or on the desktop, or select text in a document)
CTRL+A (Select all)
F3 key (Search for a file or a folder)
ALT+ENTER (View the properties for the selected item)
ALT+F4 (Close the active item, or quit the active program)
ALT+ENTER (Display the properties of the selected object)
ALT+SPACEBAR (Open the shortcut menu for the active window)
CTRL+F4 (Close the active document in programs that enable you to have multiple documents open simultaneously)
ALT+TAB (Switch between the open items)
ALT+ESC (Cycle through items in the order that they had been opened)
F6 key (Cycle through the screen elements in a window or on the desktop)
F4 key (Display the Address bar list in My Computer or Windows Explorer)
SHIFT+F10 (Display the shortcut menu for the selected item)
ALT+SPACEBAR (Display the System menu for the active window)
CTRL+ESC (Display the Start menu)
ALT+Underlined letter in a menu name (Display the corresponding menu)
Underlined letter in a command name on an open menu (Perform the corresponding command)
F10 key (Activate the menu bar in the active program)
RIGHT ARROW (Open the next menu to the right, or open a submenu)
LEFT ARROW (Open the next menu to the left, or close a submenu)
F5 key (Update the active window)

Run System Apps via Run Command

Access The Control Panel :

Add/Remove Programs control appwiz.cpl
Date/Time Properties control timedate.cpl
Display Properties control desk.cpl
FindFast control findfast.cpl
Fonts Folder control fonts
Internet Properties control inetcpl.cpl
Keyboard Properties control main.cpl keyboard
Mouse Properties control main.cpl
Multimedia Properties control mmsys.cpl
Network Properties control netcpl.cpl
Password Properties control password.cpl
Printers Folder control printers
Sound Properties control mmsys.cpl sounds
System Properties control sysdm.cpl


System Apps :

compmgmt.msc - Computer management
devmgmt.msc - Device manager
diskmgmt.msc - Disk management
dfrg.msc - Disk defrag
eventvwr.msc - Event viewer
fsmgmt.msc - Shared folders
gpedit.msc - Group policies
lusrmgr.msc - Local users and groups
perfmon.msc - Performance monitor
rsop.msc - Resultant set of policies
secpol.msc - Local security settings
services.msc - Various Services
msconfig - System Configuration Utility
regedit - Registry Editor
msinfo32 - System Information
sysedit - System Edit
win.ini - windows loading information(also system.ini)
winver - Shows current version of windows
mailto: - Opens default email client
command - Opens command prompt

Speed Up Share Viewing: Registry Hack

This is a great tweak. Before I found it, I was always smashing my head against the table waiting to view shares on other computers.
Basically, when you connect to another computer with Windows XP, it checks for any scheduled tasks on that computer - a fairly useless task, but one that can add up to 30 seconds of waiting on the other end - not good!
Fortunately, it's fairly easy to disable this process.

First, navigate to HKEY_LOCAL_MACHINE/Software/Microsoft/Windows/Current Version/Explorer/RemoteComputer/NameSpace in the Registry.

Below that, there should be a key called {D6277990-4C6A-11CF-8D87-00AA0060F5BF}.

Just delete this, and after a restart, Windows will no longer check for scheduled tasks - mucho performance improvement!

How to Hack your Windows Experience Index

The results of the Windows Experience Index are stored in an XML file that you can modify to spoof your score.

Who wants to show off a 2.1 system?

Let’s make that a 9.9 powerhouse.


Navigate to C:\Windows\Performance\WinSAT\DataStore.
Open up the most recent file in that folder. Make sure that your account has write access to that file. If not change the file permissions.
Parse the file looking for the WinSPR entry. These are the items you want to edit. The maximum value you can use is 9.9.
Save the file and you just turned your 2.1 system into a supercomputer.

Search MegaUpload and Rapidshare Using Google: a Google Hack

We can search for anything we want fastly and accurately with a little tricks with Google.
Ok here’s the trick.

For MegaUpload, put the following in Google:


Video files:
avi|mpg|mpeg|wmv|rmvb site:megaupload.com
Music files:
mp3|ogg|wma site:megaupload.com
Programs/Applications files:
zip|rar|exe site:megaupload.com
eBooks files:
pdf|rar|zip|doc|lit site:megaupload.com
For Rapidshare, put the following in Google: Video files:
avi|mpg|mpeg|wmv|rmvb site:rapidshare.de
Music files:
mp3|ogg|wma site:rapidshare.de
Programs/Applications files:
zip|rar|exe site:rapidshare.de
eBooks files:
pdf|rar|zip|doc|lit site:rapidshare.de
Note: For MegaUpload and Rapidshare searching, narrow down you search for what you want by putting your query at the first part.

Say if you want to search for Windows XP tutorials in Rapidshare use the query: Windows XP tutorials pdf|doc|lit|rar|zip site:rapidshare.de

Adding "INSERT" Option in CD Drive Context Menu: Registry Hack

Here goes the step-by-step procedure:


Download this file, extract it and copy the DLL file to "%windir%\System32" folder.
Then copy following code in notepad:


Windows Registry Editor Version 5.00

[HKEY_CLASSES_ROOT\CLSID\{02A07E80-EFA2-11D4-8306-A7EBD4C50C7C}]
@="CDEject Context Menu Shell Extension"

[HKEY_CLASSES_ROOT\CLSID\{02A07E80-EFA2-11D4-8306-A7EBD4C50C7C}\InprocServer32]
@="C:\\WINDOWS\\system32\\cdeject.dll"
"ThreadingModel"="Apartment"

[HKEY_CLASSES_ROOT\Drive\shellex\ContextMenuHandlers\{02a07e80-efa2-11d4-8306-a7ebd4c50c7c}]
@="{02a07e80-efa2-11d4-8306-a7ebd4c50c7c}"


Save the file with any name but the extension must be .REG
Now double click the file, it'll ask ur permission, accept it.
Now u'll get an Insert option in the CD Drive context menu.

How to show your name after time in Windows Taskbar

Here is a trick to add up youur name in place of AM and PM beside time in Windows taskbar. Its simple. Here the steps for do that:
*Start -> Control Pannel -> Regional and Language option
*Customize (beside English US)
*Go to TIME tab
*Change AM symbol and PM symbol from AM and PM to your name
*Apply
*Hit OK

Is it changed ??? Might be not ...
 *Now go to time in taskbar and Double Click it to open "Date and time property"
 *Look place where time changes in digital form i.e. 02:47:52 AM
 *Click to arrow to change the AM or PM by selecting and press arrow.
 *It will Show your name or name that was entered by you
 *Apply and OK.

Enjoy!

Use your Flash Disk as a Temporary RAM in Vista

Till this date, Microsoft’s windows had two options for the memory requirement of the computer, so that the computing can be done at cheaper rates and that too without installing the physical memory.
1)Physical Memory (RAM)
2)Page File (A virtual memory file, stored on hard disk).

The page file is used by the Windows OS to cater the needs of various applications when the physical memory is fully used up. The reason for that is, that Virtual memory is slower as compared to the physical memory and thus Phyical memory takes the first priority.

However, with the release of Windows Vista, Microsoft has introduced a new technology called ReadyBoost. With the help of this technology one can use any Flash drive, SD Cards, CF Cards as the third memory option for the computer.

Now, the benefits of Flash Drive or Cards as a source of Memory :

1)It is faster than the virtual memory which is accessed through the hard disk drive.
2)It is cheaper as compared to the actually Physical Memory.

How can it be activated ?

In order to activate the ReadyBoost technology on your FlashDrive or Memory Cards, you have to follow these steps:

*Open My Computer.
*Right Click on the Removable Disk Drive and select Properties.
*Click on ReadyBoost Tab.
*Enable the feature by selecting the option and allocate the amount of space you want to use as memory.

Note:
*Regardless of the fact that you use Readyboost or not, you need at least 512 Mb of memory to run      Windows Vista decently.
*If your device is not giving the option of ReadyBoost then it means that it doesn’t clear up the minimum data trasfer rate required by ReadBoost technology.

Change the Registered User Information: Registry Hack

How Change the Registered User Information? Its simple ..
You can change the Registered Owner or Registered Organization to anything you want even after Windows is installed.

1.Open RegEdit
2.Go to HKEY_LOCAL_MACHINE\SOFTWARE\Microsoft\Windows\CurrentVersion.
3.Change the value of "RegisteredOrganization" or "RegisteredOwner", to what ever you want

Thats it!. And you need to reboot your Windows for see the result.

How to access your friends Machine remotely !

If you have physical access to your friends machine then you can access his machine remotely using telnet server. All you have to do is to create a user account there then hide that user from logon screen and then start telnet server and finally mark telnet as a exception in firewall.
These steps can be carried out simply and faster using a simple batch file (instal.bat). Here the source of batch file:

Speed up your Mozilla Firefox

Speed up FireFox with this hack:

Generally, typing about:config in adress bar of Firefox.
Goto line network.http.pipelining and network.http.proxy.pipelining. As default, this is false.
Double click in this key, select Toggle change to true.
Change key network.http.pipelining.maxrequests to 30.
Right click, select New > Integer, name the new key is nglayout.initialpaint.delay and set value is 0
According to your computer you can adjust like this:

Tips for make XP as easier as never before

Opening Ports or Adding Allowed Programs with SP2's Firewall
1.Click on Start / Run
2.Enter in firewall.cpl
3.Click on the Exceptions tab

Adding a Port for Internet Access
1.Click on the Add Port button
2.Name it whatever you want
3.Enter in the ports you want to open

Adding a Program for Internet Access
1.Click on Add Program... button
2.A list of all installed programs will be displayed
3.Highlight the one you want to include for Internet access
4.Click on the OK button


Autoexec.nt or Config.nt Errors
If you are getting errors similar to:
The system file is not suitable for running MS-DOS and Microsoft Windows applications. Choose 'Close' to terminate the application.

Try copying the file from \windows\repair directory to the one that is in the \windows\system32 directory.


Common Control Panel Applets
The follow are some common Control Panel Applets that are located in the \windows\system32 directory.
If you find yourself using any of these frequently, then you can simply make shortcuts to them on your desktop.

Forget XP SP3, and Vista SP1, Have a Taste of Windows 7

The third service pack for Windows XP and the first major refresh for Windows Vista, are not even out in final form, as Vista SP1 moved from pre-beta to fully fledged beta, followed by a preview of XP SP3, but the releases are already old news.

In parallel with the development of Windows Server 2008, formerly codenamed Longhorn, Vista SP1 and XP SP3, Microsoft is also focusing on building Windows 7, formerly codenamed Vienna. Windows 7 is designed to be the successor of Windows Vista, and is currently planned for 2010. Microsoft Distinguished Engineer Eric Traut gave a presentation of the kernel of Windows 7, the operating system's core, which is designed to have a minimal footprint.
MiniWin "is the core of Windows 7. It is a collection of components that we've taken out. A lot of people think of Windows as this really large, bloated operating system, that's maybe a fair characterization, I could admit. It is large, it contains a lot of stuff in it, but at its core, the kernel and the components that make up the very core of the operating system, actually its pretty streamlined. It's still bigger than I'd like it to be but we've taken a shot recently at really stripping out all of the layers above and making sure that we have a very clean architectural layer", Traut revealed.

How To Reinstall Windows Without Losing Anything

Over time, Windows loses stability. If you keep a computer for more than two years, at some point you're going to have to bite the bullet and reinstall Windows from scratch. But contrary to popular belief, you won't have to reformat your hard drive (with one exception, discussed below). The bad stuff you need to get rid of is all in your Windows folder.
Before you begin, gather your Windows and application CD-ROMs. Back up your data files (just to be safe), and then clear two days off your calendar. If everything goes smoothly, you can reinstall Windows in a few hours. But you have to assume something will go wrong: You may not be able to find a necessary CD, or data won't be where you thought it was, or something will simply refuse to work.

Multiple and Share Your PC with BeTwin 2.43

BeTwin is a software that enables two to five users to share the computing power of a single computer, i.e. the Host PC. It creates a virtual PC station for each user to simultaneously and independently operate in each station, similar to the user operating on the Host PC. It makes use of the pre-emptive multitasking feature of the Windows operating system to fully utilize the unused processing power in processors and enables users to run the same or different applications simultaneously and independently to create and edit documents, and to share peripherals, for example, CD-ROM, printers and other hardware installed on the Host PC.
All users can also surf the Internet and access emails at the same time using only one modem, one telephone line, one ISP account and even share network access with unique customized desktop and network login.

BeTwin runs and displays information directly from DOS, Windows and Java applications of the Host PC without requiring any compression or decompression of the displayed information, thereby providing a multi-user platform for additional users to be added to a Host PC.

BeTwin provides cost benefits by reducing the user’s initial investment, cost of upgrading and cost of maintenance and service. The process of installation is quick and simple. By installing the video card into the Host PC, connecting the Universal Serial Bus keyboard, mouse, speaker and monitor and installing the BeTwin software, an additional user is added.

Best and fast way to Lock your computer

Lock My PC™ is an easy in use, powerful and compact tool to lock your computer from unauthorized use. When you leave your computer unattended, the program disables the hot keys (including Ctrl+Alt+Del), mouse, locks CD/DVD ROM doors and displays a lock screen. Nobody can access your system without providing the correct unlock password.
Unlike another similar computer lock software that cannot lock Ctrl+Alt+Del on a computer running Windows XP, our Lock My PC runs own keyboard driver to block such key combinations. Moreover, bulletproof startup lock guarantee that when your computer locaked at startup, this lock cannot be bypassed even in safe mode!

Making Windows Xp Start 60% Faster

Whenever you start your computer, you are faced with a few moments of thumb twiddling while Windows XP boots and prompts you to log on. Although you should expect to wait for a few moments, sometimes Windows XP seems to boot rather slowly. In fact, you may notice that over a period of time the PC that used to roar to life seems a bit sluggish instead. Fortunately, you can perform several techniques that help Windows XP get the bootup speed you want. This chapter explores how to put these techniques to work.

Vista System Restore

Are you one of the many computer users who went from using Windows XP to Windows Vista? It seems to be “the thing to do” these days, but let’s be honest here.

Are you having trouble finding some of the things you absolutely loved using in XP? How about the system restore feature, for example? I know that’s one of my favorites, but it’s so difficult to find in Vista. Well, today I’m going to give you the lowdown on how you can easily find it and start using it once again!

To get to the system restore window, right click on the Computer icon on your desktop and choose Properties. From there, click on the System Protection link on the left hand side. Another box will come up asking you if you want to continue on or cancel. Click Continue and then make sure you’re under the System Protection tab. At the top of the window, there’s a link you can click on to learn about how much disk space you need to do a system restore, etc. You can do that if you’d like or you can just move on.

To do an actual system restore, just click on the System Restore button and go through the process. Or, if you’d like to create your own restore point, click on the Create button. Type in a few key words for the point you’d like to go back to and then hit Create again. Go through the steps and you’ll be all set. In the middle of the window, you’re able to see all of the restores you’ve done in the past. So, if this is your first time, you’ll see all of them the next time you go in to do a system restore. When you’re all done, click OK and you’ll be good to go. So, from now on, you don’t have to worry about not being able to find the system restore option in Windows Vista.

Typing Useful Symbols for MS Office Fastly

These symbols can be used in MS Word, Excel, etc.
Here fast way to type any usefull symbols in Microsoft Office applications


For © : Alt+0169
For ® : Alt+0174
For ™ : Alt+0153
For › : Alt+0155

For † : Alt+0134
For ø : Alt+0248
For ¤ : Alt+0164
For « : Alt+0171
For ° : Alt+0176
For ± : Alt+0177
For ² : Alt+0178
For ³ : Alt+0179
For µ : Alt+0181
For ¶ : Alt+0182
For ¹ : Alt+0185
For » : Alt+0187
For ¼ : Alt+0188
For ½ : Alt+0189
For ¾ : Alt+0190
For Å : Alt+0197
For × : Alt+0215
For Ø : Alt+0216
For Þ : Alt+0222
For ß : Alt+0223
For ?: Alt+1

Hope you find these useful
Enjoy...

Boost your Cable/DSL speed: a Registry Hack

Here is a simple way to boost your Cable/DSL speed, just copy the ENTIRE BOLD text in the "quote" box below to Notepad, then save them as *.reg files, ie "DslBoost.reg".
Then all you have to do to modify/restore is double-click the *.reg file!!


REGEDIT4
[HKEY_LOCAL_MACHINE\SYSTEM\CurrentControlSet\Servic es\Tcpip\Parameters]
"GlobalMaxTcpWindowSize"=dword:0000ffff


It has worked wonders with me as it increased my speed from 5.0mbps all the way to 9.9mbps or sometimes a whole damn lot more like once it hit 15.7mbps youve got to try it!!

If u want to test your speed before and after the hack, goto this link for a free test of speed.

In my machine this hack has worked well, but I haven't tried for other machines. If this hack don't work for your machine, just simple doing the "undo registry" like thats above. Here is entry for undoing this hack:


REGEDIT4
[HKEY_LOCAL_MACHINE\SYSTEM\CurrentControlSet\Servic es\Tcpip\Parameters]
"GlobalMaxTcpWindowSize"=dword:00007fff


Remember that its for Cable/DSL only and not for crazy Dial-up!!

Note:
Some people confuse "Servic es" and change it to "Services". DON'T do this because it makes the hack not work!! Also, it took me a while to find out where I saved this so please thank me for this!!!
BTW: PLEASE make sure the "Hide extensions for known file types" option is unchecked........this will enable you to change the file type from *.txt to *.reg and activate the hack.

Lock Your Computer Fastly: a Windows Trick

Leaving your computer in a hurry but you don’t want to log off?
You can double-click a shortcut on your desktop to quickly lock the keyboard and display without using CTRL+ALT+DEL or a screen saver.

To create a shortcut on your desktop to lock your computer:
Right-click the desktop.
Point to New, and then click Shortcut.
The Create Shortcut Wizard opens.
In the text box, type the following: rundll32.exe user32.dll,LockWorkStation
Click Next. Enter a name for the shortcut.
You can call it "Lock Workstation" or choose any name you like.
Click Finish.
You can also change the shortcut's icon (ie: the padlock icon in shell32.dll).

To change the icon:
Right click the shortcut and then select Properties.
Click the Shortcut tab, and then click the Change Icon button.
In the Look for icons in this file text box, type: Shell32.dll.
Click OK.
Select one of the icons from the list and then click OK
You could also give it a shortcut keystroke such CTRL+ALT+L.
This would save you only one keystroke from the normal command, but it could be more convenient.

Increasing options in Add/Remove programs

Not a fan of MSN Messenger? Don't want Windows Media Player on your system? Fair enough, but if you go to Add/Remove Programs in the Control Panel, by default none of Windows XP's 'built in' programs are visible. It's fairly easy to change, though... just open the file X:\Windows\inf\sysoc.inf (where X: is the drive letter where Windows XP is installed) in Notepad. You should see a section of the file something like this:
[Components]
NtComponents=ntoc.dll,NtOcSetupProc,,4
WBEM=ocgen.dll,OcEntry,wbemoc.inf,hide,7
Display=desk.cpl,DisplayOcSetupProc,,7
Fax=fxsocm.dll,FaxOcmSetupProc,fxsocm.inf,,7
NetOC=netoc.dll,NetOcSetupProc,netoc.inf,,7
iis=iis.dll,OcEntry,iis.inf,,7
com=comsetup.dll,OcEntry,comnt5.inf,hide,7
dtc=msdtcstp.dll,OcEntry,dtcnt5.inf,hide,7
IndexSrv_System = setupqry.dll,IndexSrv,setupqry.inf,,7
TerminalServer=TsOc.dll, HydraOc, TsOc.inf,hide,2
msmq=msmqocm.dll,MsmqOcm,msmqocm.inf,,6
ims=imsinsnt.dll,OcEntry,ims.inf,,7
fp_extensions=fp40ext.dll,FrontPage4Extensions,fp40ext.inf,,7
AutoUpdate=ocgen.dll,OcEntry,au.inf,hide,7
msmsgs=msgrocm.dll,OcEntry,msmsgs.inf,hide,7
RootAutoUpdate=ocgen.dll,OcEntry,rootau.inf,,7
IEAccess=ocgen.dll,OcEntry,ieaccess.inf,,7
This is a list of all components installed at the moment. I've taken the example of MSN Messenger - the program entry called 'msmsgs', third-last line. You can see the word 'hide' highlighted - this is the string which tells Windows not to display the component in the Add/Remove Programs list. Fix this up by simply deleting the word 'hide' like so:
msmsgs=msgrocm.dll,OcEntry,msmsgs.inf,hide,7
To this:
msmsgs=msgrocm.dll,OcEntry,msmsgs.inf,,7
Now, after restarting, you should be able to see MSN Messenger in the Add/Remove Programs list. If you want to be able to quickly view and remove all components, simply open the sysoc.inf file and do a global find and replace for the word ",hide" and replace it with a single comma ",".

The Free Tools That Can Access 100 Hidden XP Commands

Hidden Utilities XP allows access to nearly 100 hidden utilities that are not normally accessible to the average user. System information, diagnostics, repair tools and more in both Windows and Command Line utilities are now easily opened.
Hidden Utilities XP includes easy access to 53 Windows tools and 43 Command Line utilities. And, Camtech2000, its developer now gives you it for free. 

Solution for XP that can't start

XP Start up problems

If you can't get system to boot, here the solution:
Boot your PC with Windows XP installer CD ( you have to set your BIOS setup in order your CD device will be running first on Boot priority).

Let the XP Setup progress running until you see the Setup option screen.

Recovery Console: the recovery console is actually the first option you can choose in the setup. It will look something like this:

Enter = Continue R = Repair F3 = Quit


Make sure you press R at the first selection screen and then press '1' to choose to work with the Windows XP installation. When asked for the password for Administrator, enter it in otherwise just press the enter key.

From there it will give you a screen that just says 'C:\_'. Make sure you type the following just as it is shown: CHKDSK /p. This will attempt to repair any serious errors found on the partition tables. (There are also other options as far as ways to repair the XP installation but i'll let someone else show that trick.)

Afterwards reboot and if you still have problems booting up into windows XP it's time to talk recovery options. (retrieving and backing up for a clean reinstall.)

OK, good luck !

I have Windows XP on my pocket - 3

Installing applications
Now that I have shown you how to create and install a basic Windows build, I want to talk for a moment about how you can add an application to the build (prior to creating it). The PEBuilder program comes pre-configured to support a number of common Windows applications, but does not come with the applications themselves.

The reason why installing applications can be a little bit tricky is because most Windows applications modify the Windows registry. The build that you are creating is basically a collection of installation files, and the build itself does not contain a registry (the registry gets created when Windows is installed onto the flash drive).

As such, PEBuilder uses a sort of registry emulator. If you go to the C:\PEBUILDER313\PLUGIN folder, you will see sub folders for a number of different applications. If you open one of these application folders, you will see that the folder contains an INF file and a FILES folder. The INF file contains all of the information that would normally go into the registry, and the FILES folder stores all of the program's files. To see how this works, let's install an application that I'm sure most of you are familiar with Nero.

Begin by installing Nero onto the machine that's running PEBuilder, as if you planned to run Nero locally on that machine. When the installation completes, copy all of the files from C:\Program Files\ahead\Nero to C:\pebuilder313\plugin\nero burning rom\files. In this particular case, the Nero burning rom folder is the folder that has been set aside for the Nero application. The Files sub folder is intended to store Nero's system files.

Now, you must take care of Nero's registry entries. To do so, go to the C:\pebuilder313\plugin\nero burning rom folder and open the PENERO.INF file using Notepad. As I explained earlier, the INF file in an application's folder is used to store the application's registry entries. For Nero and all of the other applications that PEBuilder predefines, the INF file is pre-configured.

You just have to make a few changes that are specific to your system. In this particular case, the PENERO.INF file is designed to support both Nero versions 5.x and 6.x. Initially, the lines for both versions are commented out. You must therefore determine which version you have and then remove the semi colon from the beginning of the lines that apply to that version.

You can see how the two versions are separated. Once you uncomment the appropriate lines, just replace "Your Name", "Your Company Name" and "Your Serial Number" with your name, your company's name, and your Nero product key. Save the file, and your set to go.

The next time that you click the Build button, Nero will be included in the build. Putting XP in your pocket Running Windows from a flash drive isn't an exact science. Sometimes the process just doesn't work and there is no good reason why. As more PCs start to support booting from USB devices though, USB boots should become more standardized, and the technique should become more reliable.

Done !

I have Windows XP on my pocket - 2

Booting from the USB flash drive.

Now that you have formatted your USB flash drive and installed the boot files onto it, the next thing that you must do is to configure your PC to allow you to boot from the flash drive. This is all done through the computer's BIOS Setup. I can't give you specific instructions for this part, because every computer is different. I can give you a few pointers though.

You can access your computer's BIOS by pressing a specific key immediately after you turn the PC on. The key varies, but it is usually either [F1], [F2], or [Delete]. Once you are in the BIOS Setup, you should verify that all of your computer's USB options are enabled. This might include things like support for legacy USB devices or support for USB 2.0. If there is a time out setting for USB devices, you should set it to the max to insure that the system doesn't time out while waiting on the USB device to boot.

Next, find the section on boot device priority. Normally, a USB flash drive (which is usually listed as USB-HDD, but may be listed as a removable device) will have a very low boot priority. If the USB flash drive's boot priority is lower than the hard disk (listed as HDD) then the only time the computer would ever boot off of the USB flash drive is if the system were to fail to boot from the hard disk. You must therefore rearrange the boot device priority so that the flash drive has a higher priority than the hard drive.

I have Windows XP on my pocket -1

You can't boot Windows XP from a floppy disk the way you used to be able to with DOS. One handy way to easily boot XP is by using a USB flash drive. Here's how to make it work.

Almost everyone who has worked with computers for any length of time at all has run into at least one situation in which a problem left a PC unbootable.

What if you could return the machine to a bootable state just by inserting a USB flash drive though? Believe it or not, it is actually possible to install a bootable copy of Windows XP onto a flash drive and then boot a PC off of the flash drive. From there, you can use applications that you have installed on the flash drive (anti virus, anti spyware, disk repair, etc.) to fix the PC's problem. In this article, I will show you how.

The Hidden Application in Windows

You can see the hidden application you never see before in your XP. Go to Start > Run > and type in: eudcedit

and press ENTER
this will open up a font editor, names Private Character Editor, this program allowing you to design your own custom fonts and characters to be used in Windows apps like Microsoft Word, Adobe PhotoShop, etc. This the Microsoft Word Font Character hidden secret program in Windows XP. Enjoy it.

The Hidden Microsoft Song

Do you know the hidden Microsoft song? I hear this song while im installing windows, where its almost at the end where have to register your windows, enter your username.......etc.
Some people might not hear it because, your sound card driver isn't installed. If you want to know and hear that song, here it:
Go to Start > Run > Copy and then Paste, or press and hold the Start + r .
C:\windows\system32\oobe\images\title.wma
and hit Enter, of course ... Your media player should load the song, and now you can hear it.

Tweak Aero's glass borders: Vista Hack

The borders around system windows, such as dialog boxes and the Control Panel, are transparent in Windows Vista's Aero interface. These borders are hackable; you can shrink them, make them larger, and change their colors and transparency levels.
To make the borders larger or smaller:

Cannot Run .exe files ?

What causes the program to run ("execute") when you double click the file name in My Computer or put it in the Run dialog box? Briefly put, it is an entry in the Windows Registry that does this.

For many, many different file extensions for files -- such as .doc for Word documents, or .txt for ASCII text files -- there is a location in the Registry that specifies how Windows handles such files. For .doc files it specifies, usually, that the Microsoft Word program (if present on the computer), or the Windows Accessory Wordpad if MS Word is not present, will be used to open up the document file so you can read and edit it. For .exe files, it specifies the "Open" action to be that which causes the program to run.

There are a number of viruses, trojans, and worms that mess up the Registry data for running executable (.exe) files, so this can cause nothing to seem to happen when you double click an .exe file name in My Computer or try to execute one by putting the name in the Run dialog box off the Start Menu.

Windows CE on your USB Stick : How To

Portable Windows CE is a 'launcher' for the Windows CE device emulator that can run an emulator-based image from a USB keychain.Change "Mcft" in link to what it is supposed to be

Extract the emulator to a folder on your hard drive by running "setup /a". The installer will prompt you to specify a directory to extract to.
For example: D:\PortableCE.
Copy the following launcher script to the folder you extracted the setup to. You'll need to rename the file from launchce.cmd.txt to launchce.cmd

Once you have that set up, just copy the entire D:\PortableCE folder over to your USB keychain.

To launch the emulator, just plug in your USB keychain, navigate to the PortableCE folder, and run launchce.cmd. You should (hopefully) have the emulator fire up.

Change Your IP In Less Than 1 Minute

Do this steps :

Click on "Start" in the bottom left hand corner of screen
Click on "Run"
Type in "command" and hit ok

You should now be at an MSDOS prompt screen.

Type "ipconfig /release" just like that, and hit "enter"
Type "exit" and leave the prompt
Right-click on "Network Places" or "My Network Places" on your desktop.
Click on "properties"

You should now be on a screen with something titled "Local Area Connection", or something close to that, and, if you have a network hooked up, all of your other networks.

Right click on "Local Area Connection" and click "properties"
Double-click on the "Internet Protocol (TCP/IP)" from the list under the "General" tab
Click on "Use the following IP address" under the "General" tab
Create an IP address (It doesn't matter what it is. I just type 1 and 2 until i fill the area up).
Press "Tab" and it should automatically fill in the "Subnet Mask" section with default numbers.
Hit the "Ok" button here
Hit the "Ok" button again

Run System Apps via Run Command

Access The Control Panel :

Add/Remove Programs control appwiz.cpl
Date/Time Properties control timedate.cpl
Display Properties control desk.cpl
FindFast control findfast.cpl
Fonts Folder control fonts
Internet Properties control inetcpl.cpl
Keyboard Properties control main.cpl keyboard
Mouse Properties control main.cpl
Multimedia Properties control mmsys.cpl
Network Properties control netcpl.cpl
Password Properties control password.cpl
Printers Folder control printers
Sound Properties control mmsys.cpl sounds
System Properties control sysdm.cpl


System Apps :

compmgmt.msc - Computer management
devmgmt.msc - Device manager
diskmgmt.msc - Disk management
dfrg.msc - Disk defrag
eventvwr.msc - Event viewer
fsmgmt.msc - Shared folders
gpedit.msc - Group policies
lusrmgr.msc - Local users and groups
perfmon.msc - Performance monitor
rsop.msc - Resultant set of policies
secpol.msc - Local security settings
services.msc - Various Services
msconfig - System Configuration Utility
regedit - Registry Editor
msinfo32 - System Information
sysedit - System Edit
win.ini - windows loading information(also system.ini)
winver - Shows current version of windows
mailto: - Opens default email client
command - Opens command prompt

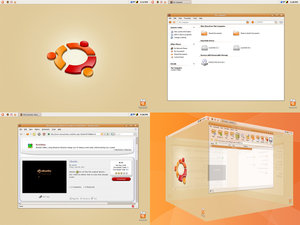
Make Up Over Your Windows Look Like Ubuntu

If you are using a dual boot system with Ubuntu and Windows, you can clearly notice the limitations Linux has. And for many (myself included), Linux is extremely difficult. After awhile I came to the conclusion that I didn’t need ubuntu at all, but I still loved to look and feeling, after searching for ways to make my windows computer have that gnome feeling this is what I found:
Start with the visual style, if you haven’t already install Uxtheme Multipatcher, this will remove the limitations on your system, in order to install new themes. Then download the Human Visual Style Ubuntu Linux.
Go to C:\Windows\Resources\Themes and safe your download theme in there.

Remove the limit on TCP connection attempts: P2P Hack

Windows XP SP2 introduces a few new twists to TCP/IP in order to babysit users and "reduce the threat" of worms spreading fast without control. In one such attempt, the devs seem to have limited the number of possible TCP connection attempts per second to 10 (from unlimited in SP1). This argumentative feature can possibly affect server and P2P programs that need to open many outbound connections at the same time.

Rant: The forward thinking of Microsoft developers here is that you can only infect 10 new systems per second via TCP/IP ?!?... If you also consider that each of those infected computers will infect 10 others at the same rate:
second 1: 1+10 computers
second 2: 10+10*10 computers (110 new ones)
second 3: 10+100*10 computers ( 1110 new ones)
second 4: 10+1000*10 computers (11110 new ones)

You mouse is broken? Use your cellular phone as mouse!

Using ControlFreak we can use our mobile as mouse for PC. This freeware application is a plugin for winamp. So to use this application winamp must be installed in PC. Then install it and press ctrl+F7 and type the port COM7 in the dialog box. It will create one 'sis' file. Install it in mobile and open it. Now u can use your mobile as mouse. Using this you can operate winamp as well as you desktop.
Requirements
A Series 60 1st or 2nd edition based smart phone (3rd edition not supported)
A computer with Windows 2000 or Windows XP
Bluetooth adapter which supports the Bluetooth Serial Port Profile
Winamp 2 or 5

How to Restart Windows without restarting the Computer

When you click on the SHUTDOWN button, make sure to simultaneous press SHIFT Button. If you hold the Shift key down while clicking on SHUTDOWN button, you computer would restart without restarting the Computer. This is equivalent to term "HOT REBOOT".

Make sure you are using fast switching for user. For those who don't know here is the method :

Goto Control Panel
Double click user account
Click on change the way user log and log off, there you will make the changes by marking the two boxes.

How to change yor Cable IP

Here is the steps for change your cable IP:

Create a new batch file.
Then write in it:

ipconfig /release
netsh int ip set address name="name of connection" source=static 111.111.111.111 255.255.255.0
netsh int ip set address name="name of connection" source=dhcp

Save it with the extension .bat

Just run and enjoy it !

Lock Folders without any Software

Here the trick how to lock your folders without any software:

Open Notepad and copy the below code
Change your password in the code it's shown the place where to type your password.
Save file as locker.bat
Now double click on locker.bat
It will create folder with Locker automatically for u. After creation of the Locker folder, place the contents u want to lock inside the Locker Folder and run locker.bat again.
Locker.bat

Making Windows Xp Start 60% Faster

Whenever you start your computer, you are faced with a few moments of thumb twiddling while Windows XP boots and prompts you to log on. Although you should expect to wait for a few moments, sometimes Windows XP seems to boot rather slowly. In fact, you may notice that over a period of time the PC that used to roar to life seems a bit sluggish instead. Fortunately, you can perform several techniques that help Windows XP get the bootup speed you want. This chapter explores how to put these techniques to work.


Stopping Unneeded Startup Services

Along with the core operating system and programs that Windows XP runs when it starts, there is also a host of services involved. Many of these services are necessary for Windows XP to operate correctly. However, many of them are for features in Windows XP that you may not use at all. You can peruse the services and disable any service that you do not want to run. The fewer services that run, the more quickly Windows XP will boot.

Improve Your XP Shutdown Speed

  1. This tweak reduces the time Windows XP waits before automatically closing any running programs when you give it the command to shutdown.

How To Reinstall Windows Without Losing Anything

Over time, Windows loses stability. If you keep a computer for more than two years, at some point you're going to have to bite the bullet and reinstall Windows from scratch. But contrary to popular belief, you won't have to reformat your hard drive (with one exception, discussed below). The bad stuff you need to get rid of is all in your Windows folder.

Before you begin, gather your Windows and application CD-ROMs. Back up your data files (just to be safe), and then clear two days off your calendar. If everything goes smoothly, you can reinstall Windows in a few hours. But you have to assume something will go wrong: You may not be able to find a necessary CD, or data won't be where you thought it was, or something will simply refuse to work.

There's a difference between a repair reinstall and a complete reinstall. Though a repair (also called a refresh) will let you keep your current settings, a complete reinstall will give you a truly fresh version of Windows. Repairs are fast and easy, but they don't fix anywhere near as many problems. The instructions below are for total reinstalls, except where noted.

How To Access Locked Old My Documents in XP

fter re-install or upgrade your XP, you can't access your old My Documents folder? Don't panic, easy..
One have to do is take ownership of that folder where you have been denied access with replace the security permissions to have access.

First, you must be logged on to the computer with an account that has administrative credentials. If you are running Microsoft Windows XP Home Edition, you must start the computer in safe mode, and then log on with an account that has Administrative rights to have access to the Security tab.

If you are using Windows XP Professional, you must disable Simple File Sharing. By default, Windows XP Professional uses Simple File sharing when it is not joined to a domain. For information about how to disable Simple File Sharing, view this Microsoft Knowledge Base's article about it.

Now, follow this steps to take ownership of a folder:
Right-click the folder that you want to take ownership of, and then click Properties.
Click the Security tab, and then click OK on the Security message (if one appears).
Click Advanced, and then click the Owner tab.
In the Name list, click your user name, or click Administrator if you are logged in as Administrator, or click the Administrators group. If you want to take ownership of the contents of that folder, select the Replace owner on sub containers and objects check box.
Click OK, and then click Yes when you receive the following message:
You do not have permission to read the contents of directory folder name. Do you want to replace the directory permissions with permissions granting you Full Control?
All permissions will be replaced if you press Yes.
Note folder name is the name of the folder that you want to take ownership of.
Click OK, and then reapply the permissions and security settings that you want for the folder and its contents.

Hoopla! Now, you're grant access to your old My Documents folder!


Make Your XP Logon Screen Look Like Vista

Have you ever wondered how to change the default Windows XP logon screen? Now I got the idea to figure out how to make it look like Windows Vista instead, so I'm writing that up for you.

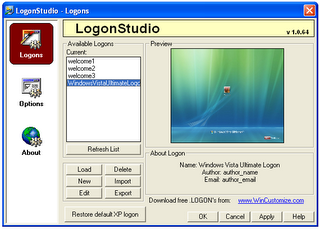
First, you'll have to download and install the free LogonStudio application and make sure that it is set as the default logon handler, which is easy since it will prompt you when you first open it. (Note that this is the same application you can use to customize Windows Vista's logon screen.)

The three default welcome screens aren't very impressive, but there's a ton of great ones on the wincustomize site, including the Vista one you see here.
Next, download and open the Windows Vista Ultimate Logon screen for XP, and select it in LogonStudio as shown above. Once you hit the Apply button, you'll see your Vista-style logon screen for XP:
Note that this will not work if you are logging into a domain, or if you use the classic style logon with Ctrl+Alt+Del.

Transform XP Interface To Vista

How To Block a Website

There are many reason why you need to know how to block a website. Some of the most common reasons are you have been targeted by spammers who use adware and popups to attack your PC. Other reasons may be to prevent your children from having access to certain site content such as porn and gambling.

Tweak Your Firefox for Super Fast Web Browsing

Fast loading web pages while surfing the Internet may have more to do with your web browser settings and preferences than your Internet connection speed.


Try these easy Firefox tweaks and you’ll see that you’re surfing the Internet from 3 to 30 times faster!

To get started, open your Firefox web browser. In the address/location bar type about:config and then press your Enter key.
In the Filter bar type network.http.pipelining. Then, double-click on this line under Preference Name in order to change the value from False to True..
In the Filter bar type network.http.pipelining.maxrequests. Then, double-click on this line under Preference Name and change the value from 4 to a higher number anywhere from 10 to 30. I set mine to 30.
In the Filter bar type network.http.proxy.pipelining. Then, double-click on this line under Preference Name in order to change the value from False to True.

Tuesday, September 20, 2011

How To Change Favicon in Blogger

How to avoid Windows XP Re-activation

The time may come that you'll need to reinstall your Windows XP. It could happen. Maybe you'll add a new motherboard or hard drive. Maybe you'll get constant errors and problems that just won't go away. Or perhaps you're a neat freak who wants to rid yourself of clutter and start fresh with a clean operating system. If you do reinstall Windows XP, then you'll need to re-activate it too; that is, unless you keep this tip handy.


See, the first time you activated XP it created a file called "wpa.dbl" that lives in the WINDOWS\system32 folder. By creating a backup of this file on disk, you can simply put it back into the folder after reinstalling XP and avoid the whole re-activation hassle. Here's how...
Go to My Computer then select your hard drive (usually drive C). Go to the WINDOWS\system32 folder and scroll way down until you find the wpa.dbl file.
Right-click and choose "Send To" then either floppy disk (make sure you have a disk in), flash disk or CD-R/RW.read more

Windows XP SP3 TCP/IP Patcher

This patch is designed only for all versions of WIndows XP SP3. By increasing the number of TCP/IP connections allowed at one time, your internet speeds up, especially when you are downloading stuff or playing online games.


I recommend you to set the limitation to 500 to 600. Before applying the patcher, remember to unplug internet connections and restart computer to make sure the TCP/IP file is not in use.

mIRC v6.34 With Server Patch

mIRC is a popular Internet Relay Chat client used by millions of people, and thousands of organizations, to communicate, share, play and work with each other on IRC networks around the world. Serving the Internet community for over a decade, mIRC has evolved into a powerful, reliable and fun piece of technology.


It has a clean, practical interface that is highly configurable and supports features such as buddy lists, file transfers, multi-server connections, SSL encryption, proxy support, UTF-8 display, customizable sounds, spoken messages, tray notifications, message logging, and more.read more

How To Change Your Motherboard Battery

First the safety rules!

The inside of a computer is a bad place full of electricity and sharp edges.
On the electricity side always when working on you computer make sure that it’s still plugged in to the power socket and the power is turned off, this is to ensure that any static
From you is discharged through the earth. The inside of most computer cases are unfinished metal and has very sharp edges so be careful.

The first signs of a battery failing are:

Your clock starts running slowly
When you boot (start) your computer it has a problem finding your hardware (no hard drive, no cd rom)

To change the battery you need the following tools:

a X-point screwdriver
an anti-static strap(optional)
a new battery (seems logical)

Then unplug all the cables from the back of the computer as you remove them make a note where they came from. (So when you finished you can put them back).read more

How To Make A Bootable Windows USB Flash Disk

1. Does your computer support booting from USB?

Usually, if its an option in your BIOS boot sequence menu, the answer to this is yes. If its not there, look for BIOS updates. If you are not sure, proceed and see what happens

2. Sorting out the "Bootability" of your USB-Drive

Connect your USB drive to your computer, directly, without a Hub. Then, shut down your computer, disconnect any other hard disk drives from it, and insert your original Windows XP CD into the drive. Start the installation, and proceed to the section where you are allowed to pick a hard drive. If it goes beyond the partition selection, your drive is already fine for booting Windows XP. If not (seems to be the cases with many of the Freecom USB HDDs for example), you will get an error like "Windows is unable to find your drive, partition, data etc bla". This is usually not a big problem.read more


Disabling Vista’s User Account Control (UAC)

User Account Control (UAC) is a feature in Windows Vista that can help prevent unauthorized changes to your computer. UAC does this by asking you for permission or an administrator* password before performing actions that could potentially affect your computer's operation or that change settings that affect other users.

UAC will alert you with one of the following messages:

Windows needs your permission to continue

A Windows function or program that can affect other users of this computer needs your permission to start. Make sure to ensure that it's a function or program you want to run.read more

System Recovery Options in Windows Vista

System Recovery Options menu Windows Vista contains several tools that can help you recover Windows from a serious error. You can perform repairs to the files that Windows uses to start itself, perform a restore operation using System Restore, and restore your entire computer and system files using backups that you have made previously.


The Recovery Console in earlier versions of Windows has been removed in Vista and replaced by several tools located in the System Recovery Options menu. The System Recovery Options menu is on the Windows installation disc. The menu might also be installed on your hard disk if your computer has pre-installed recovery options.read more

How to Hack Into a Windows XP Computer Without Changing Password

nother method to login to a password protected Windows even if you do not have the password is by making Windows accepting any passwords.


There is a far better way to get into Windows XP. It is easy and it does not reset the password. Hack into a computer running Windows XP without changing the password and find out all and any passwords on the machine (including admin accounts). You do not need access to any accounts to do this. Of course, do not do this on anyone elses computer without proper authorization.
Steps to Hack into a Windows XP Computer without changing password:read more

Speed up your XP and Vista by hack its system registry

Do you know that your computer is like your car: it needs periodic maintenance to keep it running at optimum performance. Installing and un-installing programs, surfing the Internet, emailing, and other everyday activities create a sort of “sludge” that builds up in your computer over time, much like an automobile engine. After a while, it doesn't startup like when it was new, it stalls unexpectedly, and performance is sluggish on the (information) highway.